NETCONFとRESTCONFの違い
CiscoのNETCONFとRESTCONFはどちらもネットワークデバイスの管理や設定を行うためのプロトコルですが、いくつかの重要な違いがあります。
プロトコルのベース
- NETCONF (Network Configuration Protocol)
- IETF (Internet Engineering Task Force)によって標準化されたプロトコルで、XMLベースで構成されています。ネットワークデバイスの設定や管理、モニタリングに特化しており、構成データの読み取りや書き込みが可能です。
- 主にSSHをトランスポートプロトコルとして使用し、YANGデータモデルと組み合わせて使用されます。
- RESTCONF (RESTful Configuration Protocol)
- NETCONFを補完する形で登場したプロトコルで、RESTfulなAPIを提供します。HTTPやHTTPSをトランスポートプロトコルとして使用し、リソースの管理にHTTPメソッド(GET, POST, PUT, DELETEなど)を用います。
- JSONまたはXMLフォーマットでデータをやり取りします。RESTCONFもYANGデータモデルを使用しますが、RESTfulなアプローチにより、よりシンプルで直感的なAPIアクセスが可能です。
アーキテクチャ
- NETCONF
- セッションベースのアーキテクチャで、トランザクションやロールバック機能をサポートしています。複雑な操作や大規模な設定の変更に適しています。
- RESTCONF
- ステートレスなアーキテクチャを持ち、HTTPリクエストとレスポンスの形で操作が行われます。シンプルでスクリプトや自動化ツールと統合しやすいです。
ユースケース
- NETCONF
- 大規模ネットワークや複雑な設定管理が必要な環境でよく使用されます。高い信頼性やトランザクション管理が求められる場合に適しています。
- RESTCONF
- 軽量で簡単に設定変更や取得を行いたい場合に適しています。特に、プログラム的に設定を行う必要があるシナリオや、Webサービスとの統合が求められる場合に有用です。
データモデル
- 両者ともYANGデータモデルを使用していますが、データの取得や操作の方法に違いがあります。NETCONFはYANGの機能をフルに活用し、より複雑な操作が可能ですが、RESTCONFはその一部の機能をRESTfulにマッピングして提供します。
CiscoデバイスでのNETCONFの設定
CiscoデバイスでNETCONFを使用するには、まずNETCONFを有効にする必要があります。
1.SSHの設定(NETCONFはSSHを使用します)
R1(config)#ip domain name example.com
R1(config)#crypto key generate rsa
The name for the keys will be: R1.example.com
Choose the size of the key modulus in the range of 512 to 4096 for your
General Purpose Keys. Choosing a key modulus greater than 512 may take
a few minutes.
How many bits in the modulus [1024]: 2048
% Generating 2048 bit RSA keys, keys will be non-exportable…
[OK] (elapsed time was 0 seconds)
R1(config)#
*Aug 11 08:09:11.864: %CRYPTO_ENGINE-5-KEY_ADDITION: A key named R1.example.com has been generated or imported by crypto-engine
R1(config)#username test privilege 15 secret test
R1(config)#line vty 0 4
R1(config-line)#transport input ssh
R1(config-line)#login local
2.NETCONFの有効化
netconf-yangコマンドを使用してNETCONFを有効化します。
R1(config)#netconf-yang
R1(config)#
*Aug 11 08:08:40.599: %PKI-6-TRUSTPOINT_CREATE: Trustpoint: TP-self-signed-610150851 created succesfully
*Aug 11 08:08:40.723: %PSD_MOD-5-DMI_NOTIFY_NETCONF_START: R0/0: psd: PSD/DMI: netconf-yang server has been notified to start
*Aug 11 08:08:42.871: %CRYPTO_ENGINE-5-KEY_ADDITION: A key named TP-self-signed-610150851 has been generated or imported by crypto-engine
*Aug 11 08:08:42.906: %SSH-5-ENABLED: SSH 1.99 has been enabled
*Aug 11 08:08:43.125: %PKI-4-NOCONFIGAUTOSAVE: Configuration was modified. Issue “write memory” to save new IOS PKI configuration
*Aug 11 08:08:43.126: yang-infra: PKI no mismatch found
*Aug 11 08:08:46.115: %CRYPTO_ENGINE-5-KEY_ADDITION: A key named TP-self-signed-610150851.server has been generated or imported by crypto-engine
R1(config)#
3.LinuxサーバからNETCONFでの接続
以下のPythonスクリプトを使用してNETCONF接続をしてCIscoデバイスの情報を取得します。
netconf_get_ifconfig.py
from ncclient import manager
import xmltodict

# NETCONFセッションのパラメータ
device = {
    "host": "192.168.1.32",   # CiscoルータのIPアドレス
    "port": 830,             # NETCONFのデフォルトポート
    "username": "test",     # ログインユーザー名
    "password": "test",  # ログインパスワード
    "hostkey_verify": False
}

# インターフェイス情報をフィルタリングするためのXMLフィルタ
filter = '''
<filter xmlns="urn:ietf:params:xml:ns:netconf:base:1.0">
  <interfaces xmlns="urn:ietf:params:xml:ns:yang:ietf-interfaces">
    <interface/>
  </interfaces>
</filter>
'''

# NETCONFセッションを開始
with manager.connect(**device) as m:
    # get-configでインターフェイス情報をフィルタリングして取得
    config = m.get_config(source='running', filter=filter).data_xml

    # XMLを辞書形式に変換
    config_dict = xmltodict.parse(config)

    # インターフェイス情報を抽出して1行ずつ表示
    interfaces = config_dict['data']['interfaces']['interface']
    for interface in interfaces:
        print(f"Interface Name: {interface['name']}")
        if 'description' in interface:
            print(f"  Description: {interface['description']}")
        print(f"  Enabled: {interface['enabled']}")
        if 'ipv4' in interface and 'address' in interface['ipv4']:
            print("  IPv4 Address:")
            if isinstance(interface['ipv4']['address'], list):
                for addr in interface['ipv4']['address']:
                    print(f"    IP: {addr['ip']}  Netmask: {addr['netmask']}")
            else:
                addr = interface['ipv4']['address']
                print(f"    IP: {addr['ip']}  Netmask: {addr['netmask']}")
        if 'ipv6' in interface and 'address' in interface['ipv6']:
            print("  IPv6 Address:")
            if isinstance(interface['ipv6']['address'], list):
                for addr in interface['ipv6']['address']:
                    print(f"    IP: {addr['ip']}")
            else:
                addr = interface['ipv6']['address']
                print(f"    IP: {addr['ip']}")
        print()  # 空行で区切り
IFの情報が取得することができました。

Ciscoデバイス側でもNETCONFによる接続があったことを示すログが出力されています。
*Aug 11 09:07:48.029: %DMI-5-AUTH_PASSED: R0/0: dmiauthd: User ‘test’ authenticated successfully from 192.168.1.45:54680 and was authorized for netconf over ssh. External groups: PRIV15
CiscoデバイスでのRESTCONFの設定
restconfコマンドを使用することでRESTCONFの設定が出来ます。
1.RESTCONFの有効化
R1(config)#restconf
R1(config)#
*Aug 11 09:25:54.287: %PSD_MOD-5-DMI_NOTIFY_RESTCONF_START: R0/0: psd: PSD/DMI: restconf server has been notified to start
R1(config)#ip http secure-server
*Aug 11 09:35:05.064: %DMI-5-SYNC_NEEDED: R0/0: dmiauthd: Configuration change requiring running configuration sync detected – ‘ip http secure-server ‘. The running configuration will be synchronized to the NETCONF running data store.
*Aug 11 09:35:05.937: %DMI-5-SYNC_COMPLETE: R0/0: dmiauthd: The running configuration has been synchronized to the NETCONF running data store.
2.LinuxサーバからRESTCONFリクエストの接続
以下Pythonスクリプトを使用してIF情報を取得します。
restconf_get_ifconfig.py
import requests
from requests.auth import HTTPBasicAuth
import json

# Ciscoデバイスの情報
device_ip = "192.168.1.32"
username = "test"
password = "test"

# RESTCONF URL
url = f"https://{device_ip}/restconf/data/ietf-interfaces:interfaces"

# ヘッダー
headers = {
    "Accept": "application/yang-data+json",
}

# GETリクエストの送信
response = requests.get(url, headers=headers, auth=HTTPBasicAuth(username, password), verify=False)

# レスポンスを整形して表示
if response.status_code == 200:
    interfaces = response.json()["ietf-interfaces:interfaces"]["interface"]
    for interface in interfaces:
        print(f"Name: {interface['name']}")
        print(f"Description: {interface.get('description', 'N/A')}")
        print(f"Enabled: {interface['enabled']}")
        print("="*40)
else:
    print(f"Error: {response.status_code}, {response.text}")
IFの情報を取得することが出来ました。

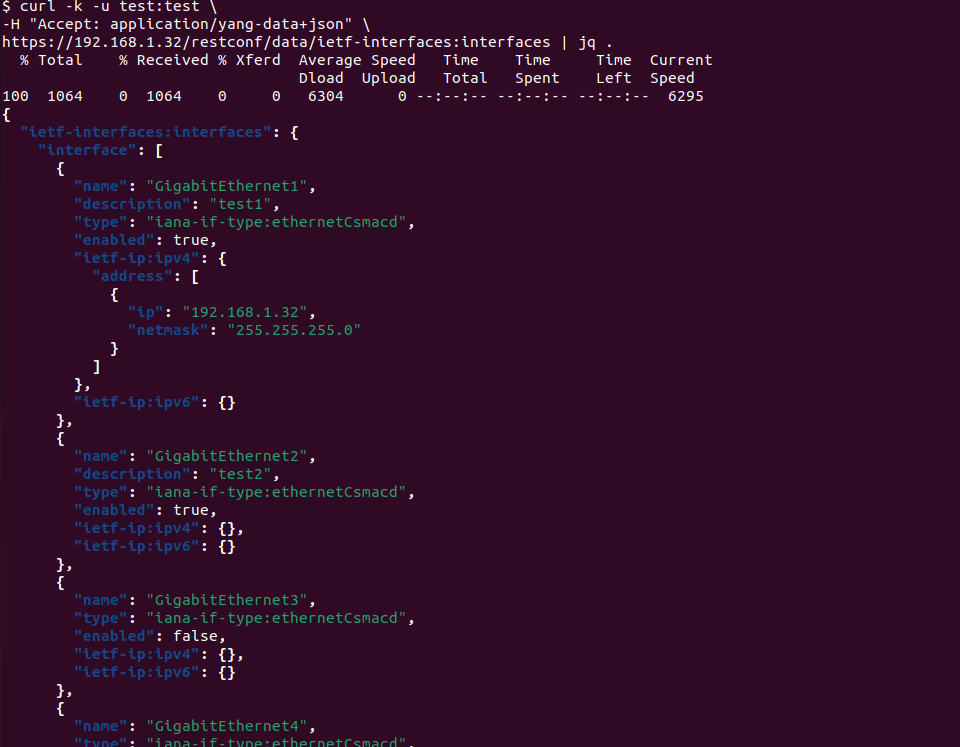
3.curlコマンドでのデータ取得
curlコマンドを使用してデータを取得することもできます。
curl -k -u username:password \
-H "Accept: application/yang-data+json" \
https:///restconf/data/ietf-interfaces:interfaces | jq .
事前にjqというコマンドラインツールをインストールしておきます。
sudo apt-get install jq
動作結果が以下になります。インターフェイスの情報を取得することが出来ました。